> For the complete documentation index, see [llms.txt](https://docs.onefinity.network/llms.txt). Markdown versions of documentation pages are available by appending `.md` to page URLs; this page is available as [Markdown](https://docs.onefinity.network/technology/run-a-onefinity-node/configuration.md).
# Configuration
### Node Script Execution Guidelines
**Important Notice**: Avoid executing node scripts with root user privileges. This method is unsupported and could lead to unforeseen complications.
**Getting Started**:
1. Obtain the latest script versions from Github.
2. Tailor the configurations to align with your local setup.
**About the Scripts**:
OneFinity offers customized scripts aimed at facilitating the node installation process, compatible with Mainnet, Devnet, and Testnet networks, ensuring a broad range of accessibility.
### **1. Download the** OneFinity **Scripts**[](https://docs.multiversx.com/validators/nodes-scripts/config-scripts#download-the-multiversx-scripts)
```
cd ~
git clone https://github.com/onefinity/of-chain-scripts
```
### **2. Configure the scripts correctly**[](https://docs.multiversx.com/validators/nodes-scripts/config-scripts#configure-the-scripts-correctly)
#### Setting Up Your Node Environment
To successfully install, upgrade, and manage your node, you'll need to make certain configurations. These involve defining a specific user account, installation directory, and network environment on your system. Let's break down these terms:
* **`CUSTOM_USER`**: The username on your computer that will be used for running the installation and other related processes.
* **`CUSTOM_HOME`**: The directory where your node will be installed.
* **`ENVIRONMENT`**: Specifies the OneFinity network you intend to connect to. This can be `mainnet`, `testnet`, or `devnet`.
Before proceeding, you'll need to update the `variables.cfg` file to include the necessary details, primarily your username. Here's how to find and set it:
**Finding Your Username**
Your system's username is crucial for the setup. If you're uncertain of your username, you can quickly find it by executing the following command in your terminal:
```shell
whoami
```
This command will display your current username. Remember to accurately record this as it will be crucial for the script configurations to function properly, this will be your *CUSTOM\_USER*.
**Configuring the Script**
After obtaining your username, open `variables.cfg` and update the placeholders (*CUSTOM\_USER*, *CUSTOM\_HOME*, *ENVIRONMENT*) with your actual user information. This is crucial for your node's functionality.
To open the `variables.cfg` file in the `nano` editor, use the following command:
```bash
nano variables.cfg
```
```
cd ~/of-chain-scripts/config
nano variables.cfg
```
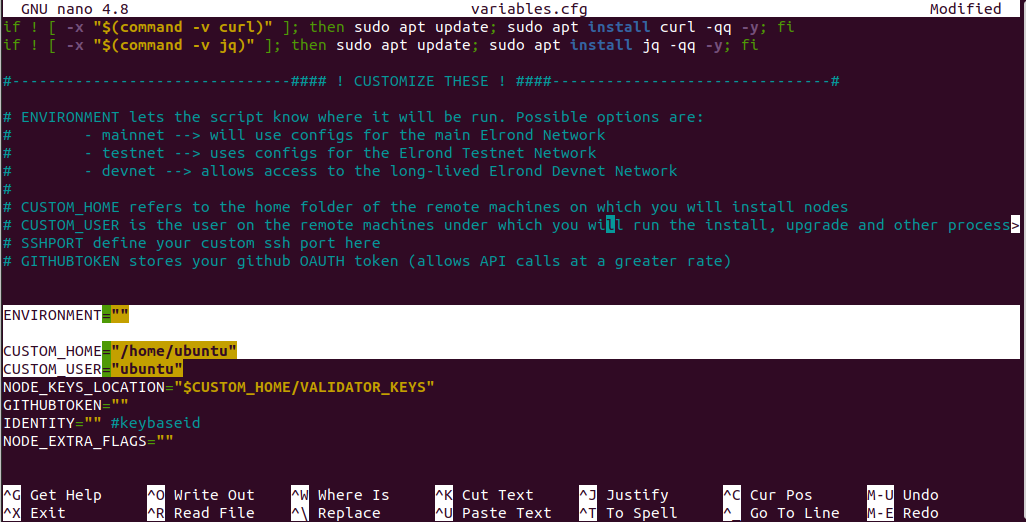
Change the variables `ENVIRONMENT`, `CUSTOM_HOME` and `CUSTOM_USER` as highlighted in the image below:
 To save and exit in **vi** or **vim**: Press `Shift`+`Z` twice.
In **nano**: Press `Ctrl`+`X`, then `Y`, and
### **Grants** elevated **privileges**
To enable `sudo` commands for your user without requiring a password, follow these steps:
1. Open Terminal.
2. Type `sudo visudo -f /etc/sudoers.d/myOverrides` and press Enter. This will allow you to edit the sudoers file securely.
3. Once the file is open in the editor, navigate to the end by pressing `Shift + G`.
4. Press `o` to start a new line. Then, enter the following line, replacing `yourusername` with your actual username (you can find your username by running `whoami`):
```
yourusername ALL=(ALL) NOPASSWD:ALL
```
5. To save and exit, press `Esc`, then `Shift + ZZ` (hold down `Shift` and press `Z` twice).
This configuration will enable your user to execute `sudo` commands without prompting for a password. Ensure you replace `yourusername` with the correct username. Proceed with caution, as this operation grants elevated privileges.
To save and exit in **vi** or **vim**: Press `Shift`+`Z` twice.
In **nano**: Press `Ctrl`+`X`, then `Y`, and
### **Grants** elevated **privileges**
To enable `sudo` commands for your user without requiring a password, follow these steps:
1. Open Terminal.
2. Type `sudo visudo -f /etc/sudoers.d/myOverrides` and press Enter. This will allow you to edit the sudoers file securely.
3. Once the file is open in the editor, navigate to the end by pressing `Shift + G`.
4. Press `o` to start a new line. Then, enter the following line, replacing `yourusername` with your actual username (you can find your username by running `whoami`):
```
yourusername ALL=(ALL) NOPASSWD:ALL
```
5. To save and exit, press `Esc`, then `Shift + ZZ` (hold down `Shift` and press `Z` twice).
This configuration will enable your user to execute `sudo` commands without prompting for a password. Ensure you replace `yourusername` with the correct username. Proceed with caution, as this operation grants elevated privileges.